 Aside from some new upgrades being available to build at the keep, and some new keep-related resources to collect, the order of the day in Act 3 is to gather some potential allies for the upcoming fight against the King of Shadows (I agree with the Luskan ambassador in regard to the silliness of the name). Basically, that means that Crossroad Keep has become a new quest hub, with the world map now being restricted to locations that relate directly to this purpose. All except for the town of Ember, which has no one new to recruit. I went down the well to see if I could gain the friendly goblins as allies, but there was no new dialogue with them. There were also some characters available to recruit to work at Crossroad Keep, which don't seem to be directly related to the upcoming battle, like a dancer for the tavern and a couple of extra merchants.
The other locations (with one notable exception) were pretty small and self-contained, not like the similar ally-gaining quests in Dragon Age: origins, which had very large diversions for each one. In at least one case (Highcliff), it seemed like they might have planned them to be larger originally, because they involved some boss-level fights with groups, phases, and adds, but these were all located right there, without having to crawl through a dungeon to reach them.
The simplest of these was also the hardest. I had to fight a character named Light of Heavens in a one-on-one duel. Again, me as an unarmoured spellcaster, and her as an armoured sword-swinger with knockdowns, high hit points, and lots of spell resistance. Once again, with this fight, the devs show their disregard for clothies by requiring it to be a solo effort. This was a slightly laggy location, with dozens of citizens spawning from houses and evacuating the city, but not enough to interfere with the gameplay. It took several tries, but I finally beat her with the use of about 10 summoned creatures (in a series, since I could only have one at a time), 2 or 3 blast globes, just about all my spells, and lots of running around the marketplace in a big circle to gain enough distance to cast spells at her, since my speed was just slightly higher than hers. The process was basically starting with a summon, running away until it got her attention, then casting spells at her until she killed it (which didn't take long), then running away far enough to summon another creature before she reached me, then running some more until it got her attention, and so on.
The one in Highcliff where I had to fight a lizardman shaman king was a much better fight, and much more fun, but it was, again, right there in town.
 The druid circle one involved two of the companions, Elanee and Bishop, which gave it more character, but I don't see why it needed Bishop there at all. He was a forced companion when I went to that area, but didn't seem to do or say anything that made his presence mandatory. This was a minor annoyance since I had stripped him of all his gear when I left him behind at the first opportunity, and when he showed up I didn't have any armour on hand that he could wear. I never gave back his dagger, either, because I have Neeshka using it. The only reason I can speculate that Bishop might have been required, since he didn't contribute any unique action, and his commentary was inconsequential, is that perhaps his having witnessed the events there might play a part in a later development. There was some conversation back at the Keep from an earlier plot development when Bishop made some comment about what "we" went through, even though he hadn't been in the party at that time. I don't trust this chaotic evil ranger, and I don't like the fact that he's making his home in my keep, away from the watchful eye of Duncan back at the Sunken Flagon.
The Alliance with the Wendersnaven bit finally addressed the bard issue I had mentioned earlier. Finally, I got a bard instrument (the only one in the game?) that actually boosted bard skills rather than yet another equippable item that does nothing but cast some low-level spells when activated. Finally, a gameplay reason for my bard to carry an instrument!
There was an encounter with the ghost of a dragon in a location revealed to me by Ammon Jerro, which was plot-related, but separate from the "recruitment" theme of the rest of them. The dragon had information about how to reforge the silver shards into the sword we needed to kill the King of Shadows (why it would work this time, when it didn't work the first time, is unclear.) Apparently, Ammon had spoken to this ghost several decades ago when he was researching where to find a weapon to fight the King of Shadows in the first place.

The dragon's ghost was chained to this area due to a giant floating crystal dragon heart being physically chained up in this location, guarded by a couple of smaller dragons. By the ghost's request, I fought those guardians and destroyed the heart to release the spirit. This led me to yet another return to West Harbour, and at least this time one of the companions expressed a little emotion over what happened there. Grobnar did, too.
The best quest in Act 3
 The recruiting of the Ironfist clan was the most developed of this section. It's almost out of place compared to the other ones, but you won't hear me advocate scaling it back to match the others. This one had much more companion involvement, and its task actually took place in multiple locations, and brought back events from way back in the storyline, involving an artifact-level pair of gauntlets that we had found at that time, the Gloves of Ironfist.
But talking with other voiced members of Khelgar's clan made me notice that Khelgar's the only one of his clan with that "Scottish" accent! I seriously can't understand how production companies keep doing this sort of thing. It's like Deanna Troi being the only Betazoid with her accent (her mother doesn't have it, and her father was apparently American), or Ambassador Delenn being the only Minbari with hers, or Londo Mollari being the only Centauri with his. Khelgar might have been a required companion for this section (if not, he should have been), but I can't tell because he was already in my party, reclaiming his role as the party tank after the death of Shandra.
To gain the support of the dwarves, we had to prove to the clan that Khelgar was a member in good standing, and not an outsider who had deserted them. To do this, we had to recover the second of the clan's patriarch's artifacts: The Belt of Ironfist. With that and the matching gloves, Khelgar would have the augmented strength necessary to lift the Hammer of Ironfist, once wielded by King Loudram, in a kind of sword-in-the-stone test of worthiness.
The belt was in the possession of some fire giants, so it was off to Mount Galardrym to find them.

Mount Galardrym was the biggest outdoor area I've seen in the game, if I'm not mistaken, and it was the absolutely best designed area. The long, winding paths leading up the mountain, overlooking lava pits, were clearly crafted with love and care. There were numerous watchtowers with trapped approaches, guarded by groups of fire giants and hell hounds who were fun to fight (though perhaps too easy for giants). There were several points of interest and several separate destinations to reach. One spot offered a scouting overlook to any surviving giants that our party may have missed by taking alternate paths, and offered an opportunity to push some large rocks down onto their heads as a surprise attack.
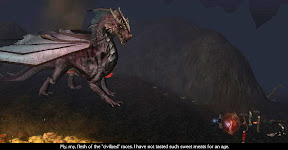 But the highlights of this area, aside from its aesthetics, were the two boss battles, one at the end of each path. One led to a big red dragon, and the other to the powerful fire giant king with his retinue of more giants and hell hounds than I had battled on the way up. Each of these bosses wanted the other one dead, as it happened, but I was not inclined to make any deals with either of them, so I fought each of them in turn. First the dragon, and then the giants.
The dragon fight was very challenging, and a lot of fun. My party was wiped on the first try. On the second try, I memorised a whole different set of spells in preparation, buffed nearly the whole party for immunity to fire damage (as many as I could with the spell slots available), and made sure all my offensive spells had significant damage even if save rolls were made. It was a brilliant light show! I've never had such an enjoyable dragon battle in any game before!
 At the end of it, adding to the satisfaction of defeating a worthy opponent, the dragon's treasure hoard waited as a tantalising bonus. A huge pile of gold, and trapped chests filled with high-end gems, scrolls, and enchanted gear. This blew away the most recent other dragon battle I experienced, which was in Dragon Age: Origins (the dragon in the Brecilian Forest ruin, not the Archdemon). The fight there was less fun, and the hoard was much smaller. Here, I actually got to send my staff to haul the piles of gold back to my treasury! My standards had been lowered so far from previous games, I really wasn't expecting to be able to do that.
After I'd finished savouring my victory, I went around the mountain to the other side to face the fire giant king, which was another pretty good fight, but an anticlimax in comparison.
After gaining the Ironfist alliance, there were a few outdoor battles with the King of Shadows' forces, including a rather funny bit where we found part of his vampire army sleeping in their coffins during the day. Breaking the coffins open resulted in a crowd of vampires running around shrieking in the burning sun!
Ammon Jerro's remorse
 I came to like the character of Ammon Jerro over the course of the game, despite the ruthlessness of his actions -- especially where it was completely gratuitous. Now, some of his murders were for revenge, though I don't recall if he explained what exactly their offenses had been against him. Other murders, however, were wanton and unnecessary, like the employees at the Moonstone Mask. While it turned out that he was motivated by the goal of recovering the shards to fight the King of Shadows and prevent a larger number of deaths, and considered some innocent casualties along the way to be acceptable losses, in some of these cases he could have just gotten what he came for and gotten out, without killing the people who were not fighters, and who were incapable of actually preventing him from getting the shards.
This hidden spoiler block contains spoilers about the death of a particular character
Still, he eventually came to regret what he had done, even though it wasn't until he had unknowingly murdered his own granddaughter.
Throughout the rest of the game, his regret came up again and again. At first, he was unapologetic even in his regret, maintaining that he did what was necessary, and that he was already going to receive an unimaginable punishment. Finally, though, in a long conversation that involved an influence check to see how well I had gotten to know Shandra, I was treated to a moving scene of Ammon Jerro falling to his knees and expressing his contrition in the ruins of Shandra's farm.

Solution to a major plot bug
 There was a game-breaking bug in the battle at Crossroad Keep, after the siege tower battle, when Black Garius showed up and was giving his speech about how he was about to crush us by summoning an avatar of the King of Shadows, but it was actually pretty funny when it happened. In the middle of his speech, he apparently wandered a little too close to one of the soldiers, who sucker-punched him. This cut off his speech and he started fighting the soldiers, and never got around to summoning the avatar. Unfortunately, he was also plot-immortal at this time, so the game couldn't continue.
The solution is to open up the console and type:
rs 3541_death_nwalker
This loads up the cutscene that should play after you kill the King of Shadows' avatar, and the plot can continue from there. You will miss out on actually getting to participate in that fight, however.
I was also proven right not to have trusted Bishop in this section, since he was the one who just unlocked the gate to let the enemy in after the siege battle.
The ending
 The ending was quite the mixed bag, but I'm inclined to forgive the visible signs of the time/money running out. There were subtle signs before, throughout the campaign, such as the design of Highcliff (the "tavern" bit I mentioned in a previous post), some conversations with companions that never went anywhere, and the large difference in scale between the various alliance-gathering missions, but the first really obvious sign I noticed was when I was looking to see what there was to do in the merchant district in Neverwinter during the evacuation. There was a dead man near an outhouse named "Privy Man", who had a mysterious journal on him that described some fearsome beast under the outhouse. I looked around, but found nothing else to do with him, and when I looked for answers online, I learned that it was the remnant of some cut content -- the Archmage Startear would have sent you on a quest to kill a lich who lived under that outhouse.
Nevertheless, whatever else they cut, Obsidian at least made sure to deal with all of the named adversaries introduced throughout the campaign.
Things really started showing the time/budget strain when what I thought was going to be another major battle turned out to be me watching a slide show of retouched screenshots, with voice acting, of Lord Nasher leading his troops to battle, and then a major event in the battle, and its outcome. Surely this was originally at least meant to be a cinematic, if not something in which the player was meant to participate!

Then there was the ending scene itself, which came after the final dungeon. After defeating the King of Shadows (it shouldn't be a spoiler to know that such a thing is possible), I was treated to another very unsatisfying slideshow of retouched screenshots describing the immediate aftermath of the battle (more on that in a second), narrated by a clearly non-professional voice actor (who someone on Youtube described as "Norman, from Accounts"), which then went on to describe what happened with various people and places in the next few years.
 What happened directly after beating the boss, I was told by the narrator, was that my whole party was wiped out by the collapsing lair, because the King of Shadows was a "load-bearing boss". In other words: Rocks fall, everyone dies. I was incredulous. I couldn't believe that's how they ended it. And that was the good ending!
I spent the next few hours reading other people's reviews of that ending, as well as watching the "evil" ending on Youtube. Interestingly, while looking around on Youtube, I found that dialogue of my companions had actually been recorded to act out what I was only told had happened, and Youtube user RandonB put them together and posted the dialogue. I think that version of the ending would have been much better than the poorly narrated version, even if they had done it with the slide show method they had previously used for Lord Nasher's battle. It would have certainly been more poignant, as opposed to the whole "Then, offscreen, this happened. But never mind that -- here's what happened elsewhere over the next few years." Doing it the way they did, it actually reminded me a bit of Harry Potter and the Deathly Hollows (the final book in the series) in how the epilogue chose to answer questions that no one had even been asking, while keeping mute on issues of actual interest and relevance.
But aside from the actual ending, I enjoyed the climax very much. First was the showdown with Black Garius, and his attempts to seduce the members of my party to join his side, one by one. I actually went through this scene twice, because I wiped on the first attempt. The first time, he succeeded with Sand and Bishop (though Bishop had defected to his side earlier than in this scene), but the second time, he succeeded only with Sand. Although my influence with Bishop was predictably very low or nonexistent, considering I never included him in the party and didn't like him, and I hadn't said anything to try to convince him not to fight us, for some reason he decided to abandon both sides the second time through.
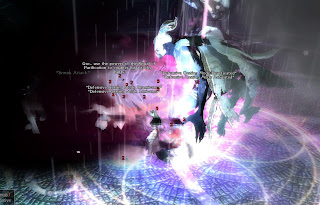
Neeshka was able to resist Garius' demon-binding on her through the power of friendship, since I liked her a lot and had a very high influence with her. I had high influence with everyone, really, except for Sand, who I neglected as much as Bishop, and much for the same reasons. So, with Khelgar, Neeshka, Grobnar, the Construct, Elanee, Qara, Casavir, Ammon Jerro, and Zhjaeve, we beat the stuffing out of Black Garius, at last, in a long battle with barriers, multiple add spawns, and several full heals on Garius' part. The rod of resurrection I was given earlier saw numerous uses during this fight. This battle also incidentally showed that it's possible to have a party of 10 fully-controllable characters, and that the previous party number limit had not been hard-coded.
 After that mini-boss, it was time to face the King of Shadows himself, after a rest to heal and refresh our spells. It was nice of him to delay his passing through the portal until my party had rested from the Garius fight. This was a major fight, and with 10 party members, it resembled a raid boss. There were several phases to the fight, involving several strategies and objectives, and this made it particularly fun. It turned out that the Silver Sword of Gith was actually necessary after all to beat the KoS, but only because it was the only weapon that could damage the portal to the shadow weave, which is apparently the direct link KoS was relying on to stay alive (even though he had managed to forge a link to it out of nothing in years past, when he was dying, so it shouldn't have been any big deal for him to just make another one). Really, this whole climax was fantastic, right up until the slide show ending.
Obsidian bit off more than they could chew, but I prefer it that way. It was already a huge campaign with a massive amount of content, and I for one am glad that they aimed high, even if they ultimately had to abandon some of their plans.
And now that I've finally gotten the last part of this review posted, I can get started on my module.


